CS 115 Lab 3, Part E: Draw a square of circles

[Back to lab instructions]


Overview

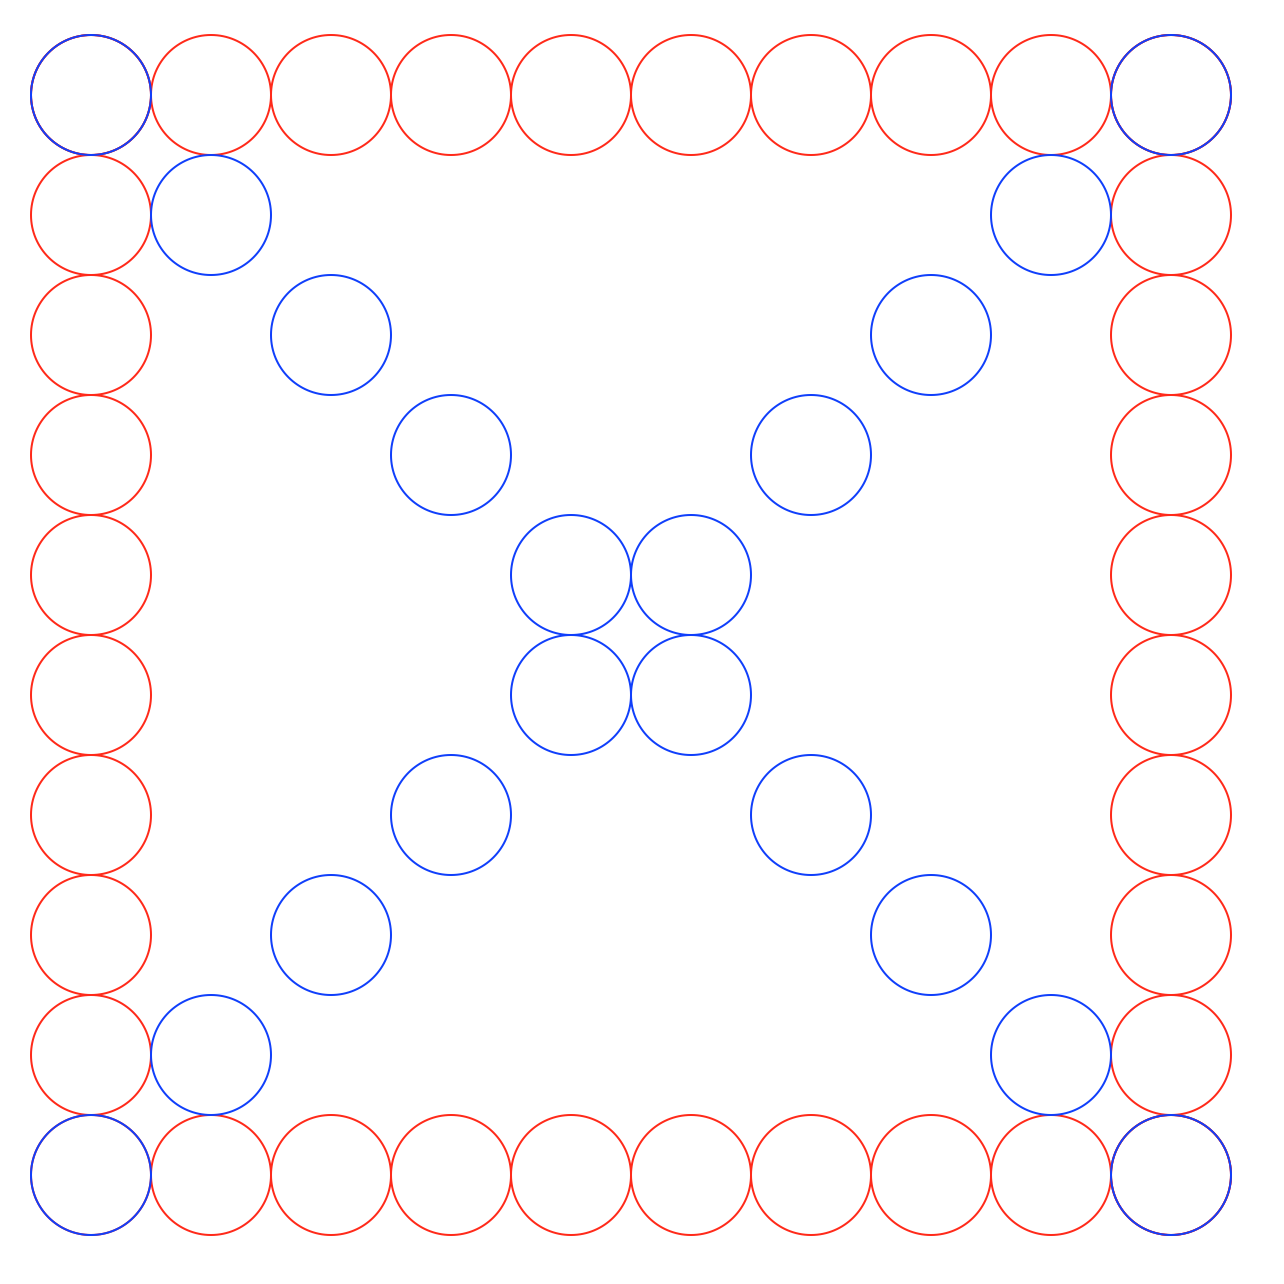
For the final part of the lab, you will write a Python program that accepts user input to generate images that are similar to the one below. The user will specify the number of circles on each side of the square shape and the radius of each circle. This image was generated for 11 circles and a radius of 50.
Square of 11 circles by 11 circles, with the diagonal filled in


Instructions

  1. In IDLE, create a new source code file called lab03e.py:
    """
    Program: CS 115 Lab 3 Part E
    Author: Your name
    Description: Using the graphics package, this program will draw a square of circles.
    """
    from graphics import *
    
    
    def main():
        window = GraphWin("Circles", 800, 800)
    
        # 1. Get the number of circles and the radius from the user.
    
        # 2. Draw the left vertical circles.
        # Copy and paste what you need from your lab03d.py here.
    
        # 3. Draw the top horizontal circles.
        # Copy and paste, and then modify the previous code-segment that draws 
        # vertical circles and make the necessary changes to it so that it 
        # draws the top row of circles.  It is okay to draw a circle on the existing
        # top circle.
    
        # 4. Draw the bottom horizontal circles.
        # Copy and paste, and then
        # modify the previous code-segment that draws the top circles and make
        # the necessary changes to it so that it draws the bottom row of circles.
        # it is okay to draw a circle on the existing bottom circle.
    
        # 5. Draw the right vertical circles.
        # Copy and paste, and then
        # modify the code-segment that draws the (left) vertical, stacked circles and
        # make the necessary changes to it so that it draws the right vertical circles.
        # it is okay to draw the right-most two horizontal circles.
    
        # 6. Draw the top-left-to-bottom-right diagonal circles.
        # Copy and paste, and then
        # modify the code-segment that draws the (left) vertical, stacked circles and
        # make the necessary changes to it so that it draws the circles that are
        # the left-to-right diagonal of the square. The change in successive x and y
        # of these circles is exactly the same as those of the horizontal and vertical
        # circles.
    
        # 7. Draw the top-right-to-bottom-left diagonal circles.
        # Copy and paste, and then
        # modify the previous code-segment that draws the left-to-right diagonal 
        # circles and make the necessary changes to it so that it draws the circle
        # on the right-to-left diagonal of the square. The change in successive x and y
        # of these circles is exactly the same as those of the horizontal and vertical
        # circles. 
    
        window.getMouse()
        window.close()   
    
    
    main()
  2. Save this program as lab03e.py.
  3. Replace Comment 1 with the two lines you used to ask the user for the number of circles and the radii of the circles.
  4. Run the program, and make sure that it asks the user for the two values in the console (text) window. It will also pop up an empty graphics window. Answer the questions and then click in the window to exit the program.
  5. Next, you'll make the changes specified in steps 2 through 7. Although you could do this in a few different ways, your code will be easier to manage if you write a separate for-loop for each step. The rest of these instructions will walk you through it. After each step, run your code to be sure it works so far.
  6. Directly under comment 2, write code that draws a stack of red circles down the left edge of the graphics window to meet the user's specifications. Choose initial values of x and y so that the top circle is 5 pixels away from the top and left edges of the window. You should be able to reuse some code from Part D.
  7. Directly under comment 3 (that is, below all of your copy-pasted code and outside of its loop), draw a row of red horizontal circles across the top, 5 pixels away from the top of the screen. You can start by making another copy of your code from comment 2 and figuring out what to modify. It's OK if you draw another circle on top of the top left circle.
  8. Directly under comment 4, draw a row of circles across the bottom. The leftmost circle in this row should line up with the bottom left circle you drew in step 2. Once again, it's OK to draw another circle on top of the existing bottom left circle.
  9. Directly under comment 5, draw a row of circles down the right edge. The top circle in this column should line up with the top right circle you drew in step 3.
  10. Directly under comment 6, draw the left-to-right diagonal. Notice that you will have to change both the x and the y coordinates each time you go through the loop. Unlike the horizontal and vertical circles, the diagonal circles won't necessarily be touching. That's OK, as long as they are equally spaced.
  11. Finally, draw the right-to-left diagonal directly under comment 7.
  12. Make sure the horizontal and vertical circles are red and the diagonal circles are blue, just like in the picture above.
  13. Test your code with several different numbers of circles and radii. If the user enters an even number of circles, the center of the square will look a little bit different, and that's OK. Here is an example with radius 50 and 10 circles per side:
    Square of 10 circles by 10 circles, with the diagonal filled in
  14. Call an instructor to demo your Part E code.
  15. Make sure that your name is in the docstring and that the docstring accurately describes what your program does.
  16. Continue to Part F.